2. Digital bodies
📆 2020 - September 29th to October 6th
What I made this week
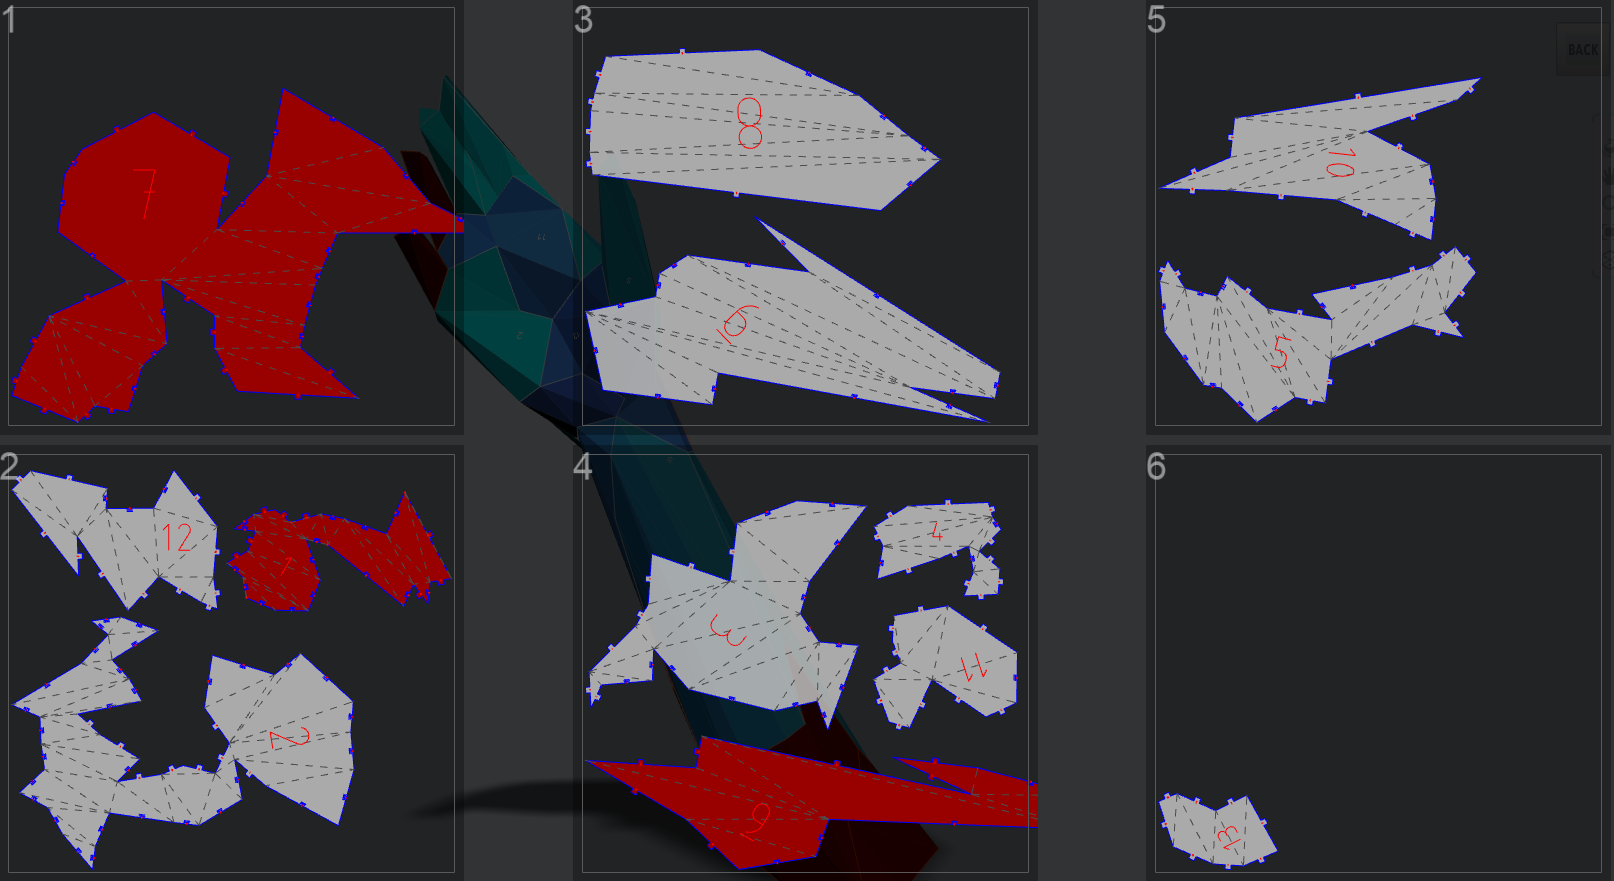
A hand and arm constructed out of laser-cut folded paper panels:
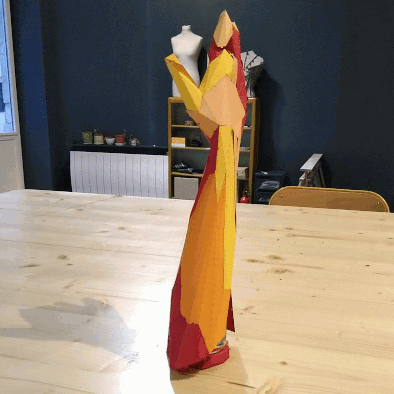
An almost-completely closing arm made of laser-cut folded panels
What I made later on...
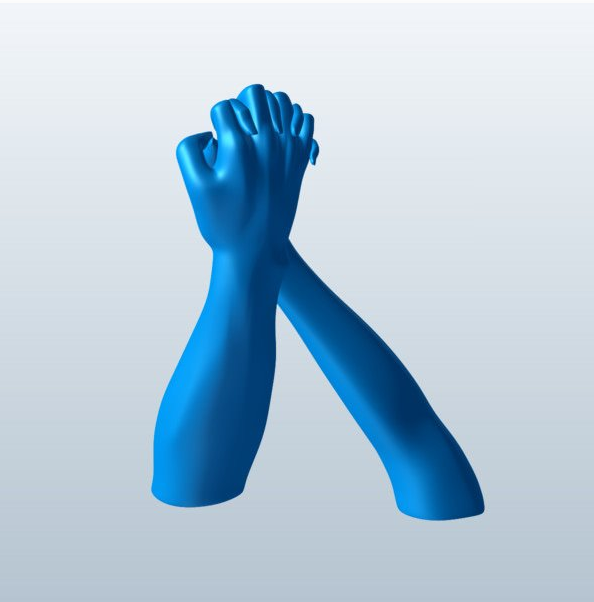
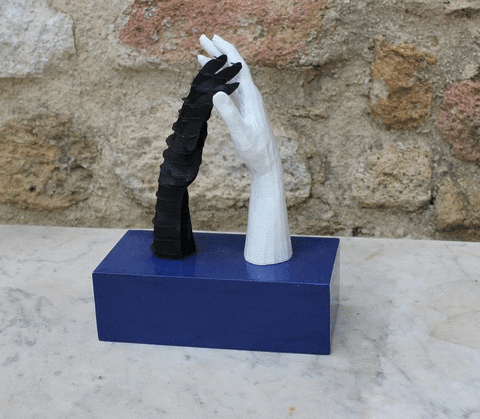
A sculpture with two hands facing, one 3D-printed and the other sliced and cut. This is a variation on what I initially wanted to do for this "Digital Bodies" week. I only had time to do it several weeks later, in December.
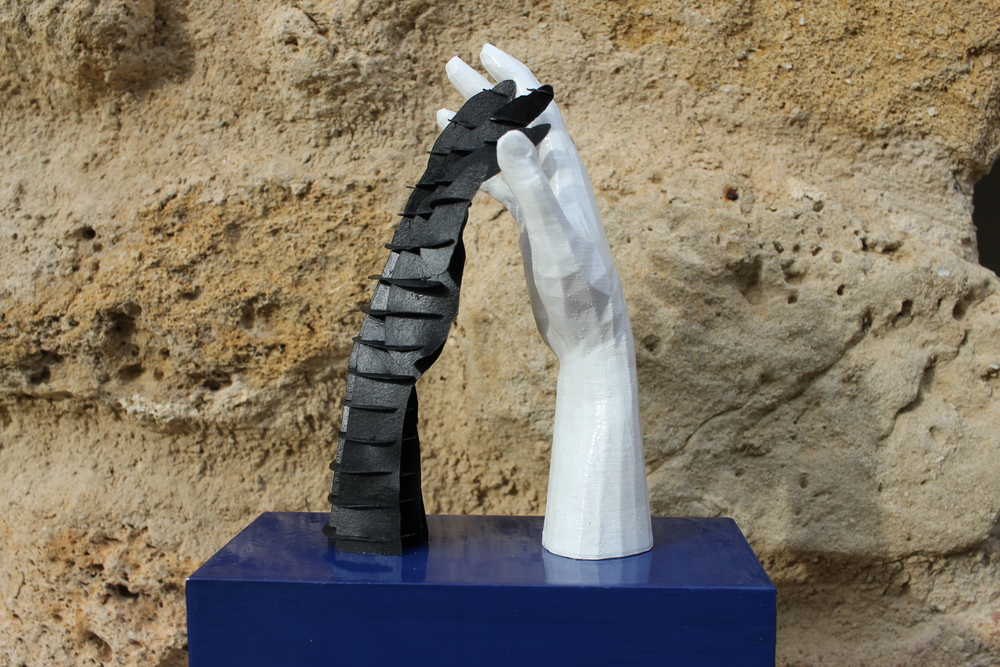
A 3D-printed hand facing a sliced version of the same hand model
How did I get there?
In this week's lecture, we talked about the representation of the human body, throughout history, and as a canvas for the designer. The way we work on this canvas has changed over time, as the tools and uses changed.
In the article Old media, digitized, make new forms (2012), Martin Gayford points out that "digitalization is everywhere, including the artist's studio". Technology is about extending the limits of what we can do.
“People see I use computers, so they say I’m making computer art,” he said. “It’s not about making computer art; it’s just using the new thing. Everybody uses it.” To carry out certain ideas, new technology is essential—or to put it another way, computer technology is making possible projects that only a few years ago would have been utterly unfeasible.
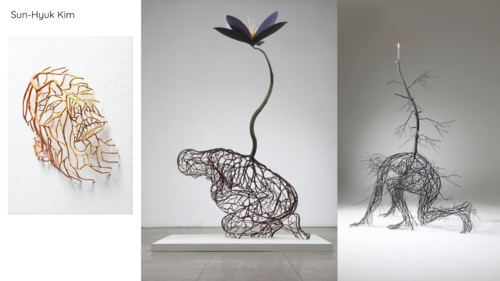
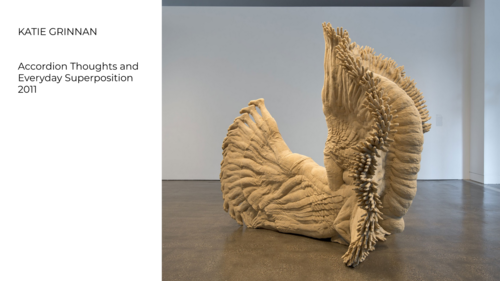
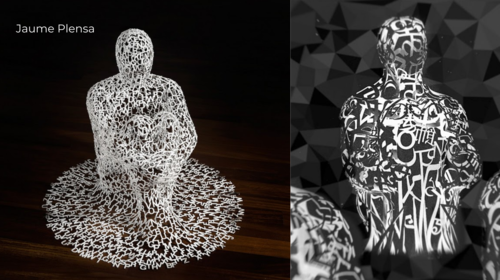
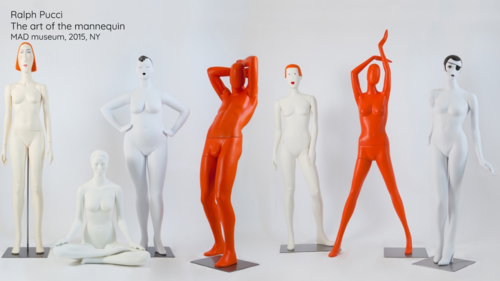
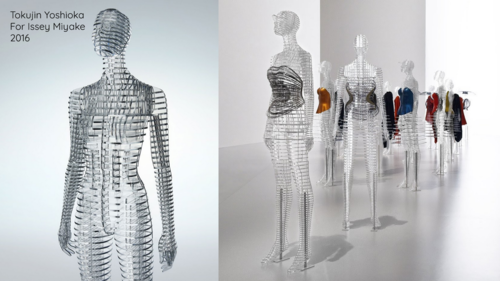
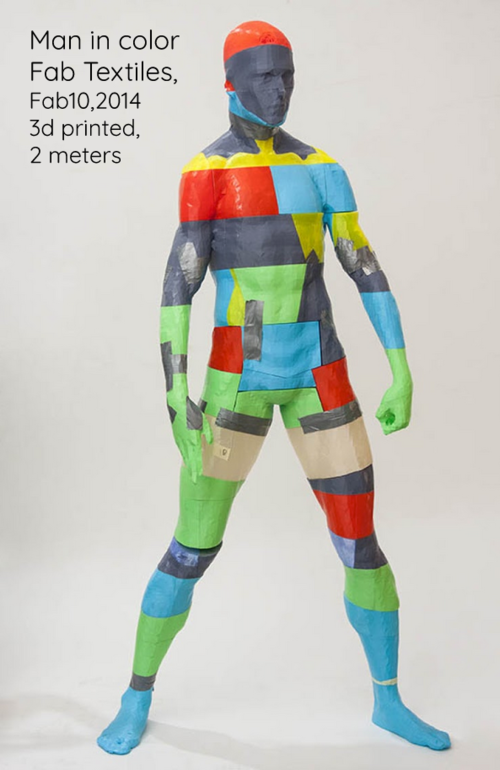
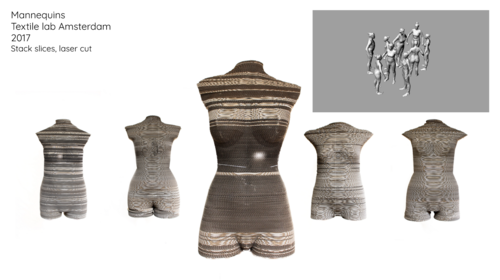
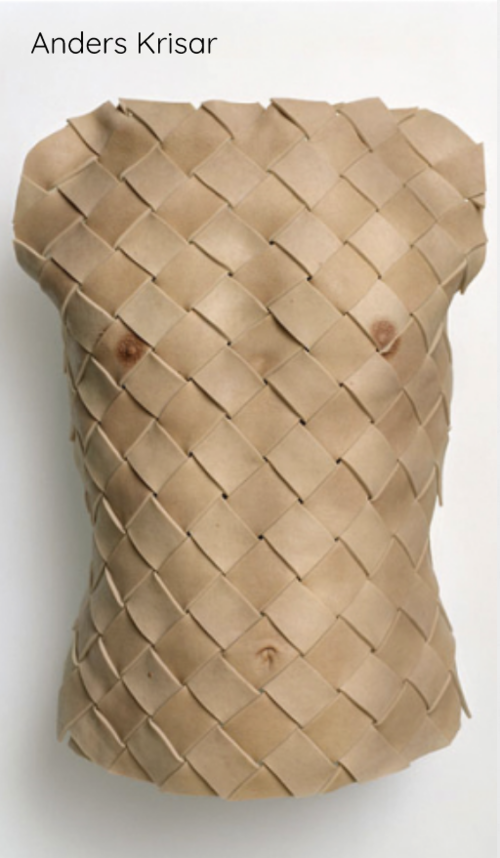
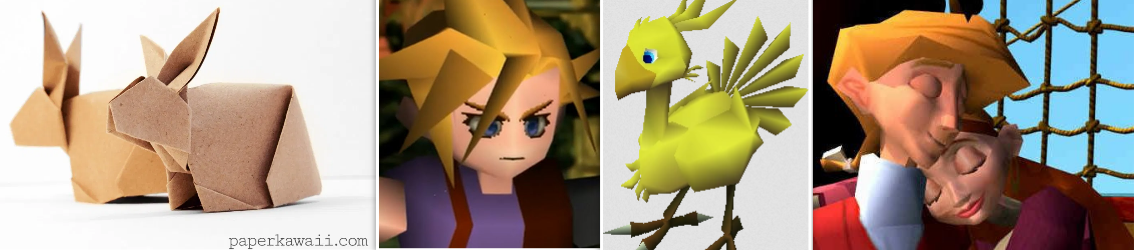
During the lecture, I was very inspired by geometrical representations of the body, especially by the following pieces (you can click on the images to go to their respective websites):

3D scanning
To scan in 3D, we used a Kinect 360. It uses an infrared camera to calculate the depth around the object.
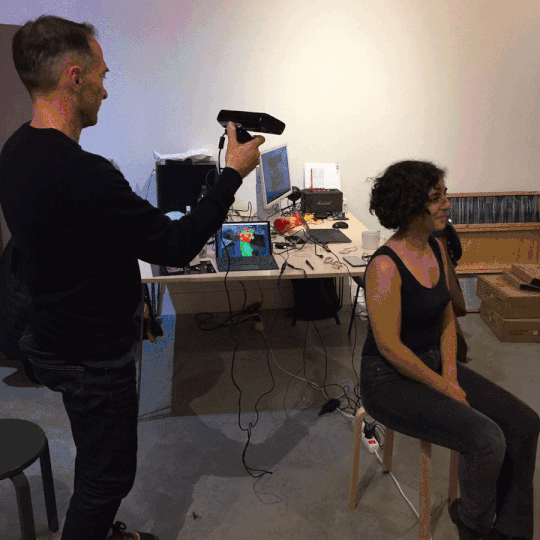
Head scanning process with the Kinect
- A cable to connect the Kinect to your computer
- Drivers to use the Kinect on Windows
- A software to 3D scan: we used Skanect, which has a free non-commercial version
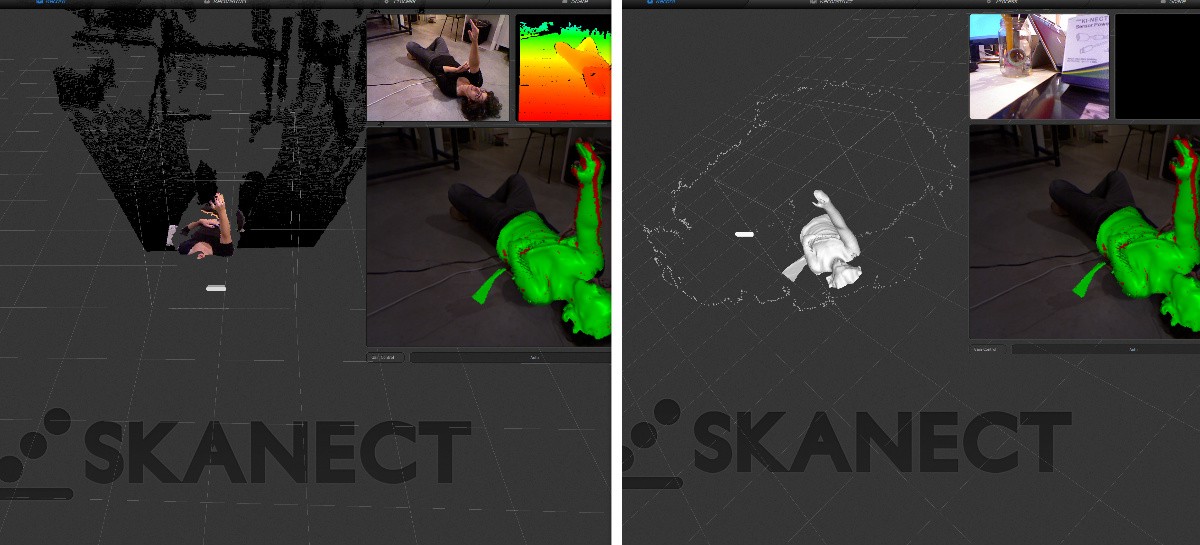
Arm scanning process in Skanect
Here is my arm, scanned in 3D. The fingers are not quite there, and the result is not very precise, probably because I moved a bit while scanning.
I also scanned my head, because I was curious of what it would make of my hair; I like the result! I might 3D-print it afterwards!
Finding a 3D model
I started downloading 3D models from the Free3d website. At this point I was a bit all over the place, downloading all the free models I liked:

3D models available at https://free3d.com/
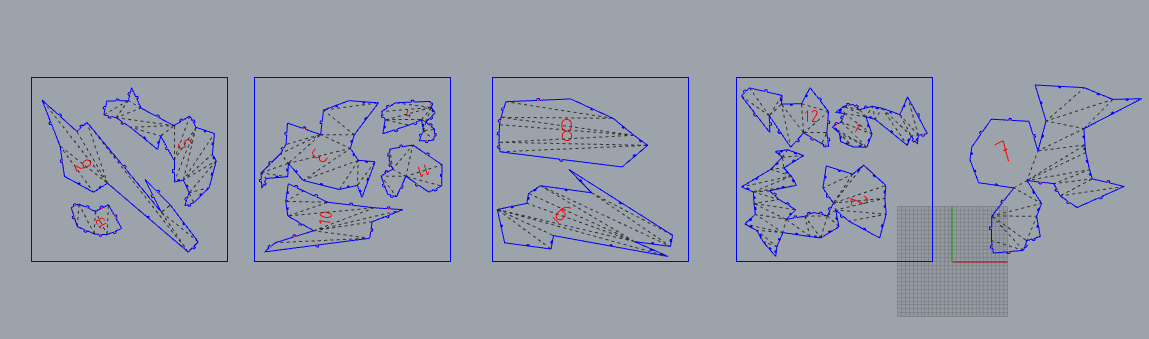
Experimenting with Slicer
I then experimented with the rendering of a hand in Slicer:
I liked the stacked slices, the rendering in the palm made me think of hand lines; I also liked the folded panels, because it makes me think of origami or old 3D in video games
A collage of origami and low-poly games this made me think about
Coming from a technical background, it is very interesting for me to learn how to use this kind of software in a more creative way, asking myself what I want to do with this, rather that just executing a technical goal set in stone.
At some point I realized I could split all the panels 🤯
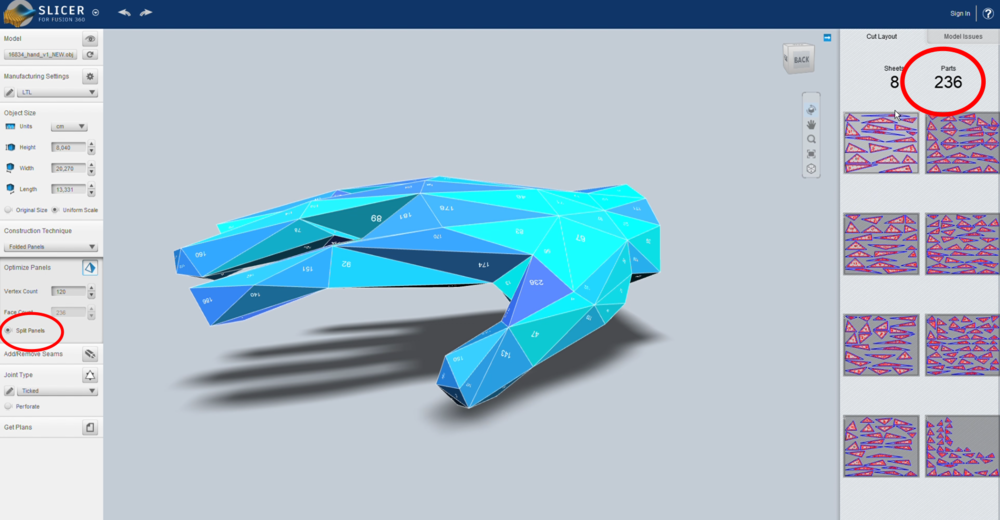
Though I really don't think I want to assemble 236 small parts of a hand 🤔🙀
Refining the idea
I really liked this 3D model of entwined hands with the forearms:
Screenshot from the model from free3d
I find it reminiscent of sculptures by Rodin, who produced different studys around entwined hands, in different materials (stone, bronze...).
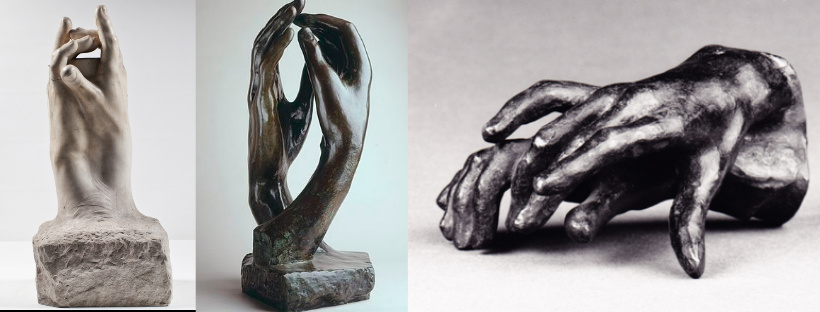
Sculptures by Rodin, from left to right: "Le secret", "La cathédrale", and a study of hands
I decided i wanted to make these entwined hands, but with each hand sliced in a different technique:
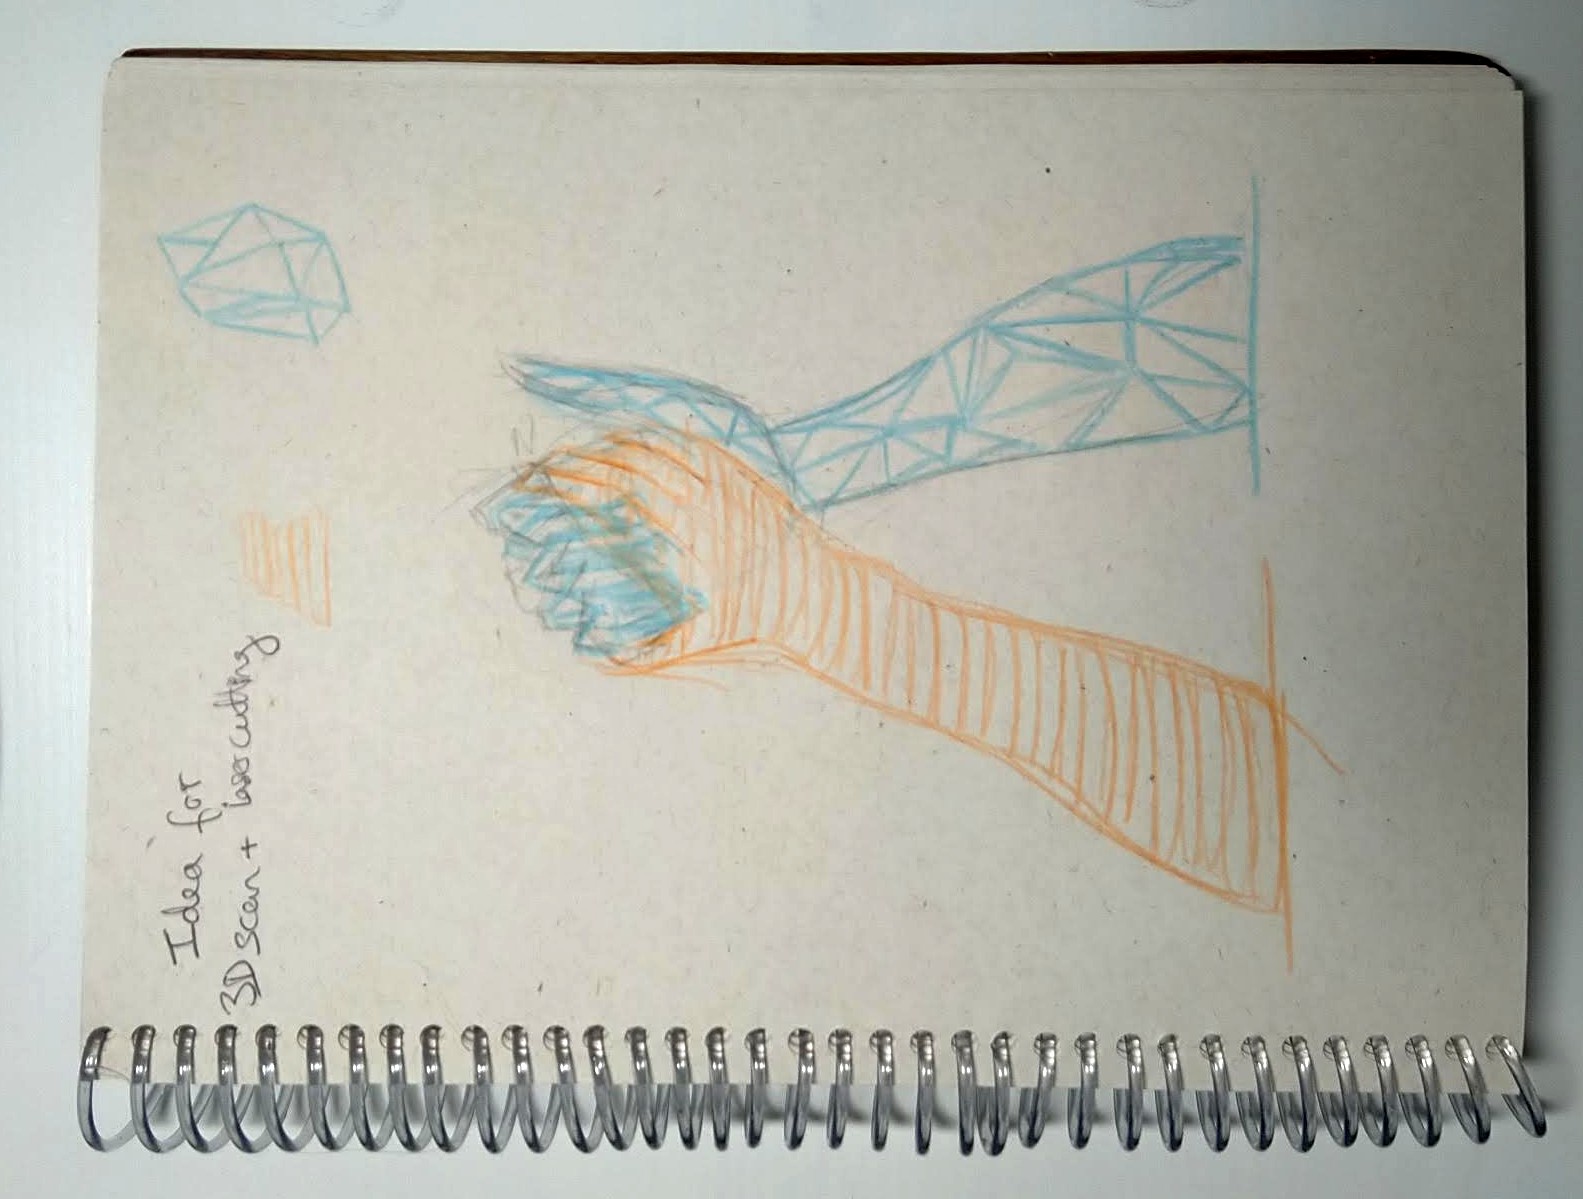
I made this drawing of one hand with stacked panels, the other with folded panels
I did not interlock the fingers here contrary to the 3D model, because it would be too complicated to interlock fingers with the folded panels hand. I also could not directly use this 3D model from free3D, as the hands in it are too tightly interlocked for me to separate them.
So I decided to create a 3D model of one hand and arm, that I would mirror to entwine.
Using MakeHuman to obtain a human figure
I created different models in MakeHuman, trying to find poses where there was a hand that looked at least a little bit like what I wanted:
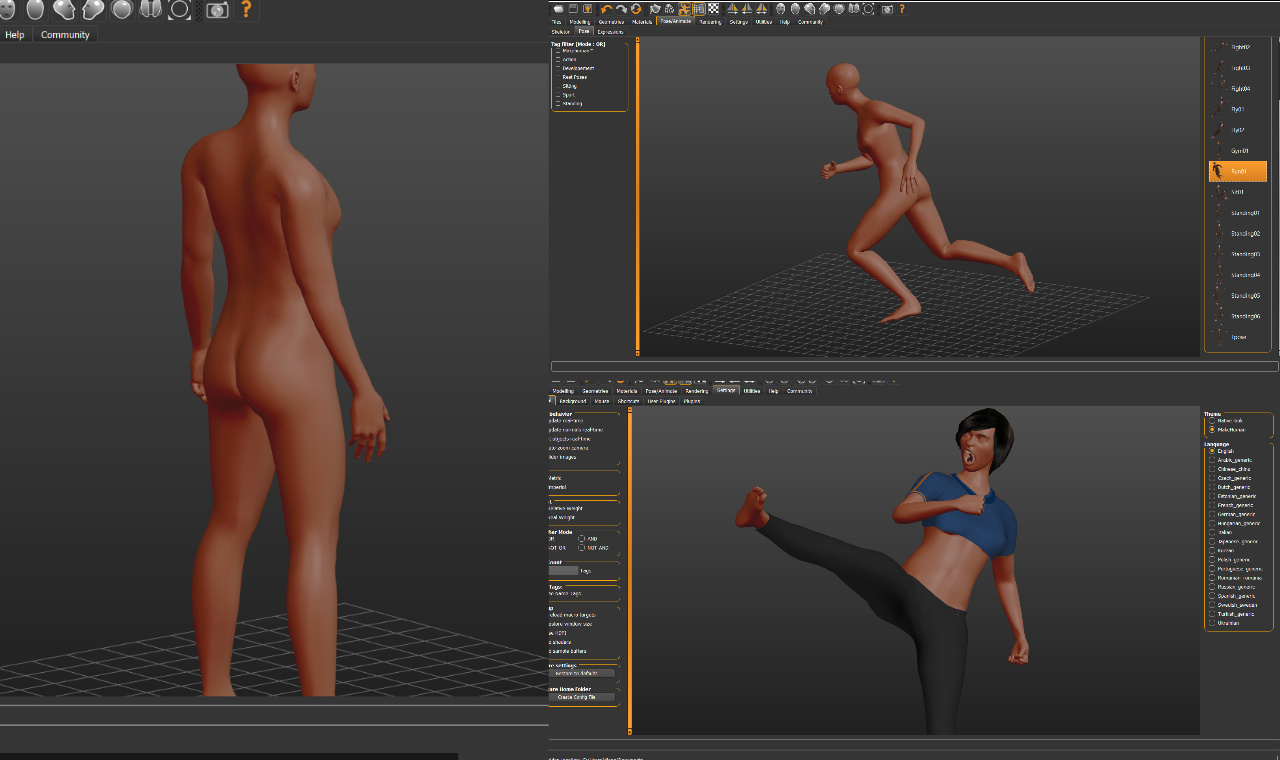
Screenshots of poses in MakeHuman
I did not specify many measurements for the figure, as I knew I was only going to use the arm. I exported the "running" and "standing" poses, not knowing yet which one would work best.
Using Rhino 6 to extract only the arm
I then used Rhino to cut only the part I wanted, using boolean operations and blocks of 3D mesh. I used the four view panels to help me see where I was creating and moving the boxes.
It is quite expensive, but has a free trial period of 90 days, and not-so-expensive Educational version. It is also arduous to learn, as it can do many things. I mainly used the features that were explained in last Wednesday's tutorial :
- working in the "mesh" tab
- separating and intersecting objects with boolean operations
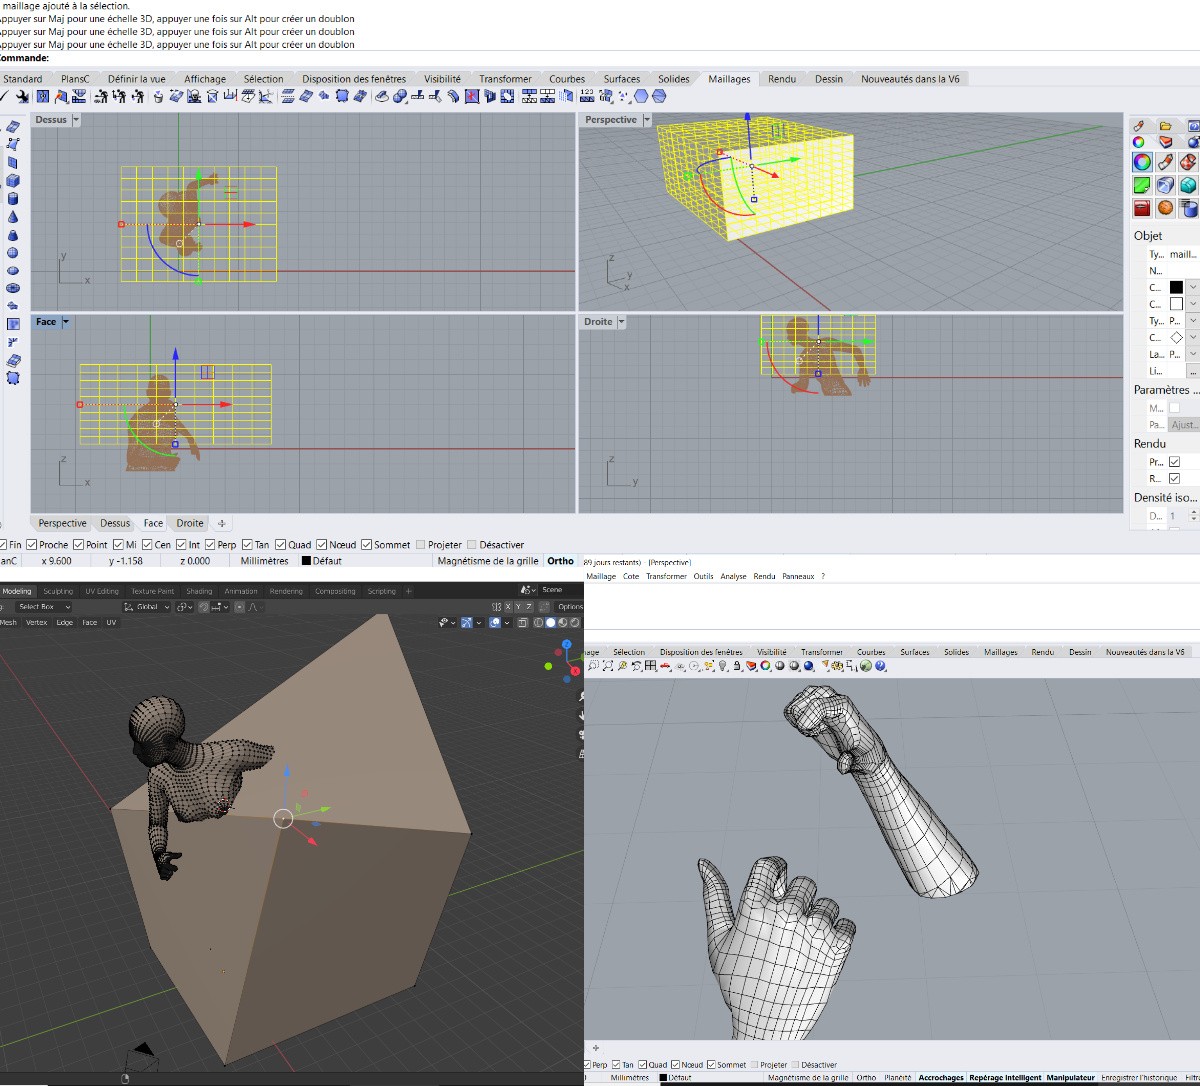
I then mirrored my hand, but I realised that the position of the fingers was too closed for the hands to entwine. I was also concerned that the "paneled" hand would be impossible to construct if the fingers were too widespread. At this point, I decided to cut off the fingers from another hand, and merge them back to this one in a different position.
Finger cutting in Rhino
Well, the joints were bit weird-looking after that...! I exported this hand as a .obj file, and decided to smooth it out in Meshmixer.
Using Meshmixer to smooth the joints
I imported my 3D arm into Meshmixer, and used the bubble brush and pinch brush to smooth the joints, and "suture" some of the fingers together:
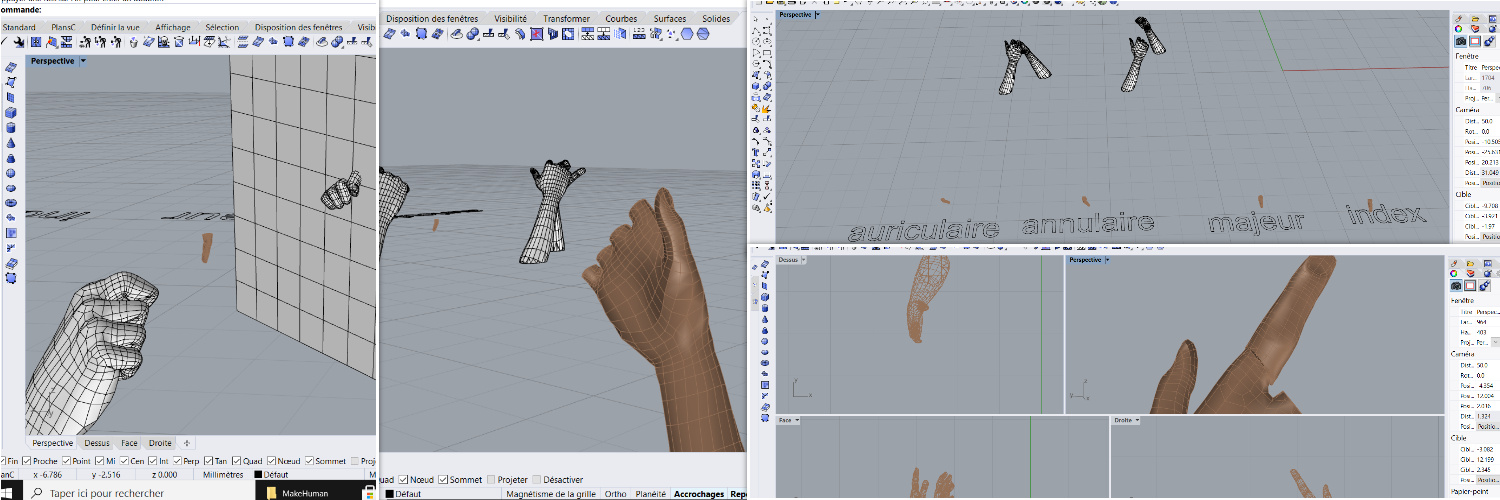
Using Slicer, for real this time
In slicer, I played with my final 3D object with the two techniques I wanted to use:
- Stacked panels
- Folded panels
Stacked panels
This one was quite straightforward. The only thing I wanted to change was to orientation of the stacking:
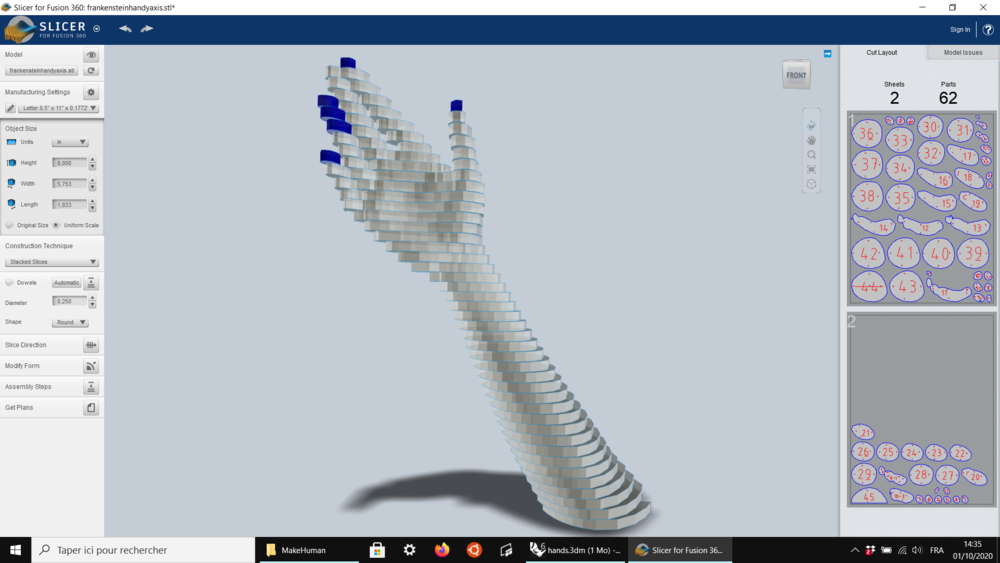
I exported the plans, but unfortunately we were not able to laser cut it this week: the machine we have at Le Textile Lab is too small for this material, and the lab where we will be able to do it was not open. Hopefully we can cut it next Wednesday!
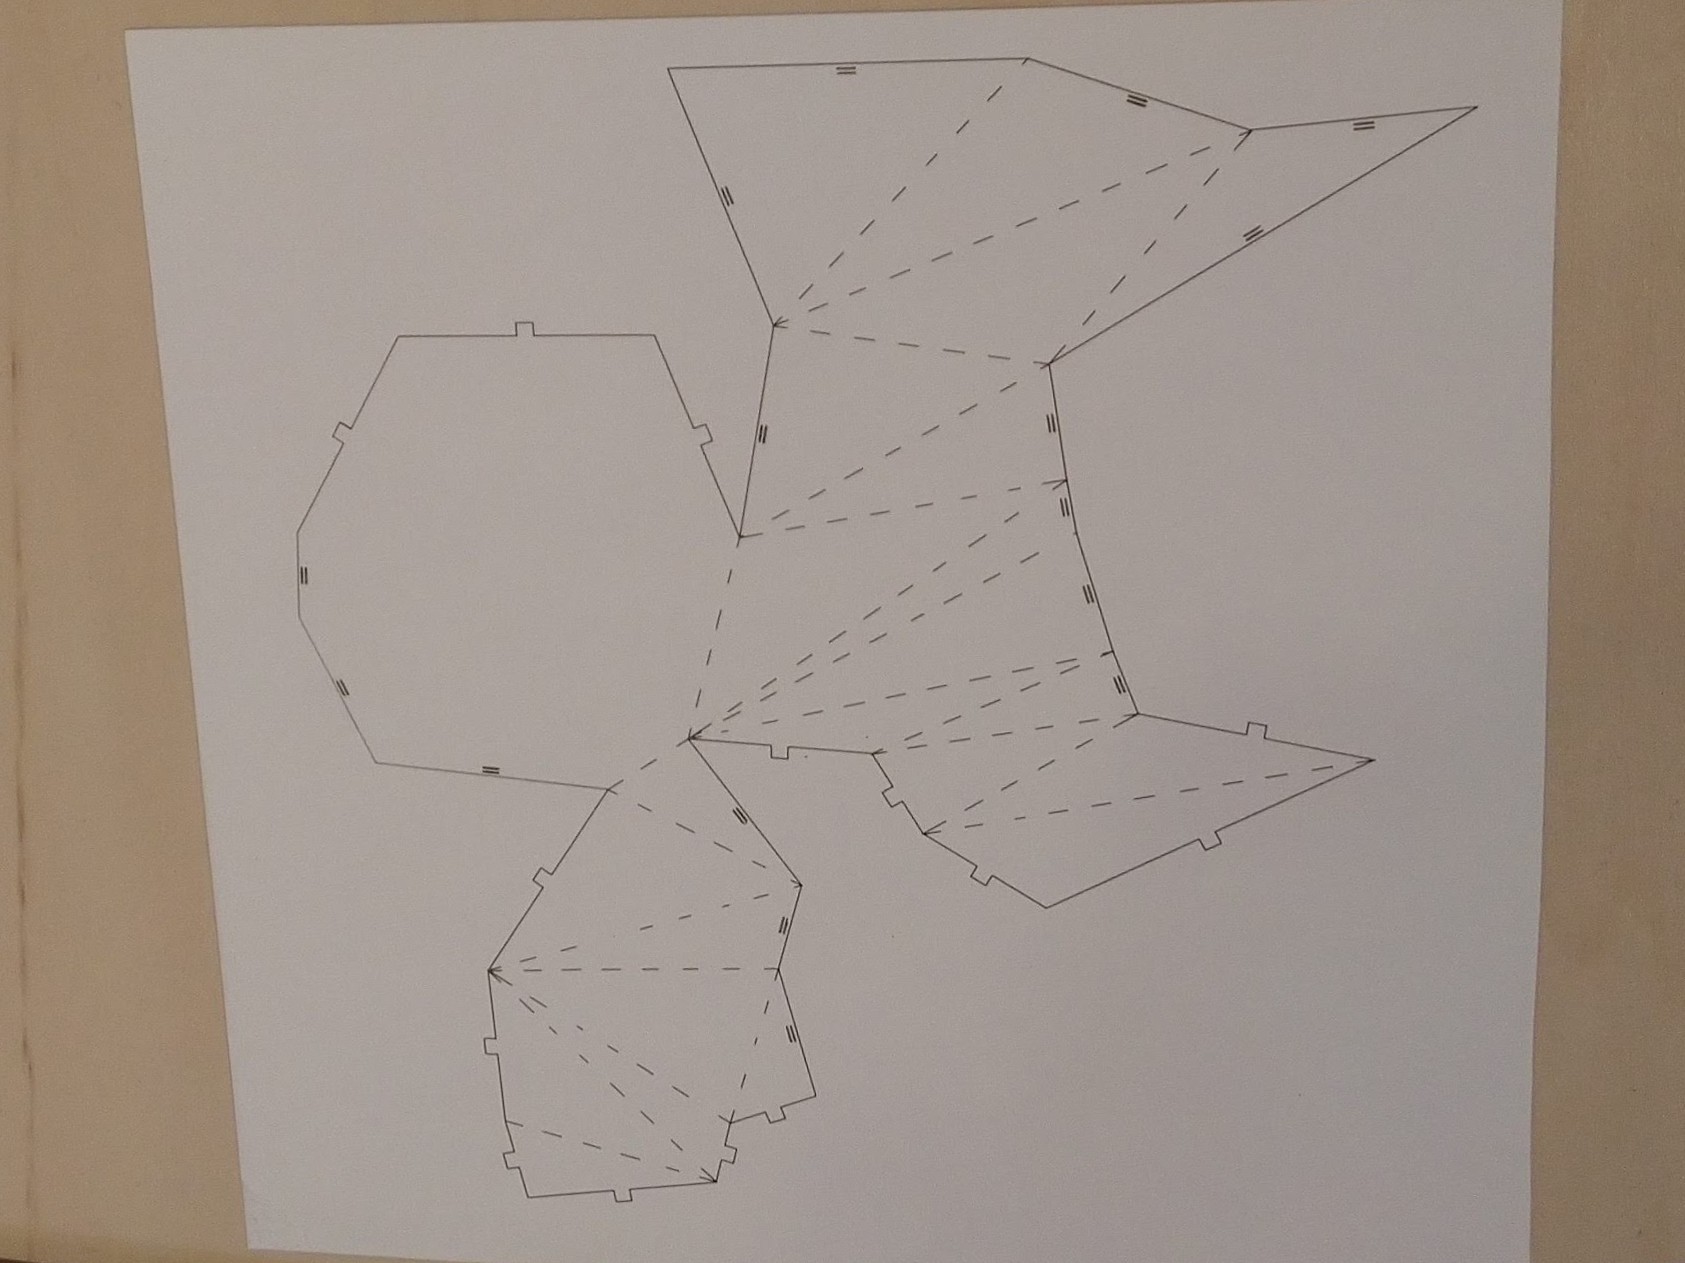
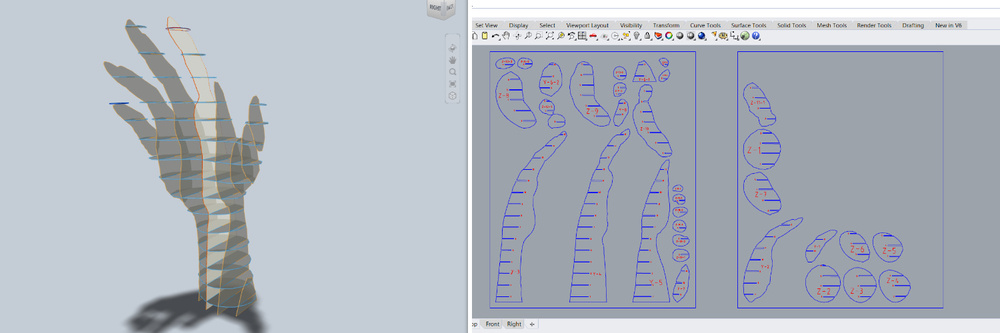
Paneled hand
For this one, I had to fine-tune the vertex number: I did not want to have too many panels, especially on the fingers parts, but I still wanted it to be a recognizable hand. I lowered the vertex count to 102, and moved some of the seams.
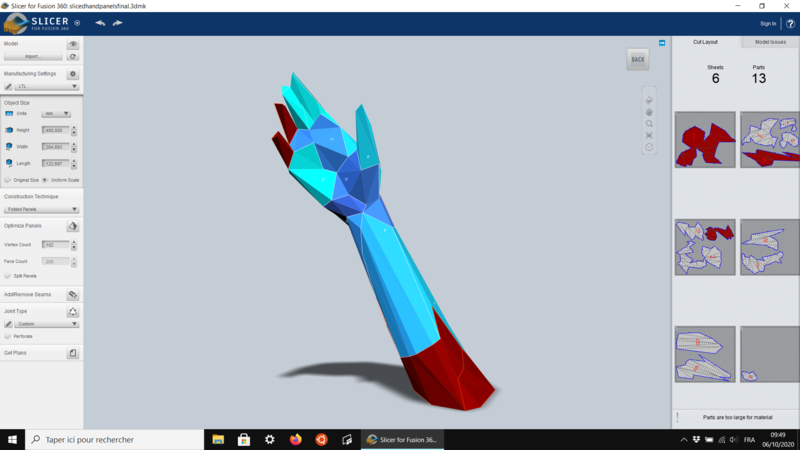
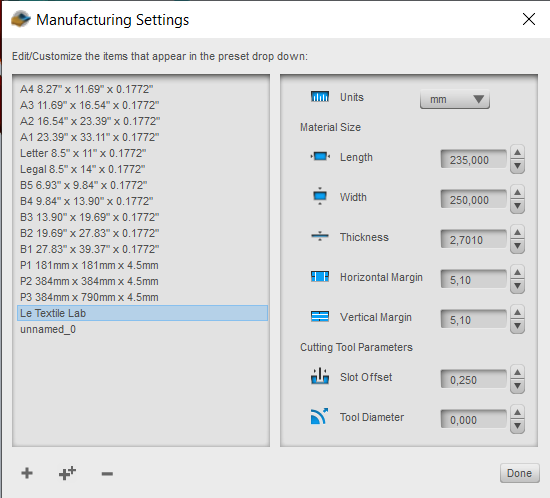
This one can be printed on the Laser cutting machine we have at Le Textile Lab, so I created a new material size for it:
I exported these plans in .dxf, to try and optimize them in Rhino.
Using Rhino to optimize the plans
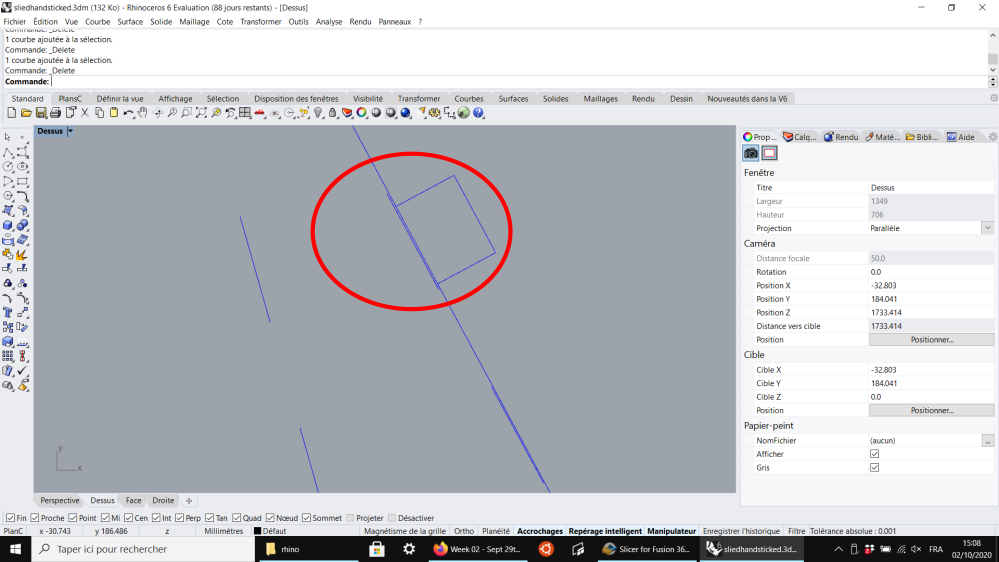
In Rhino, using only the top view this time, I selected the plans and used the following commands to have closed lines for each part of the plan:
> Ungroup
> Explode
> Join       // Joining all the lines that can be closed
> SelDup     // Selecting all the duplicate lines and deleting them
I then cleaned some of the fold lines that were too close from the side of the piece:
I also optimized the space taken by the parts, removing one of the sheets:
From the Slicer plan:
To the optimized plan:
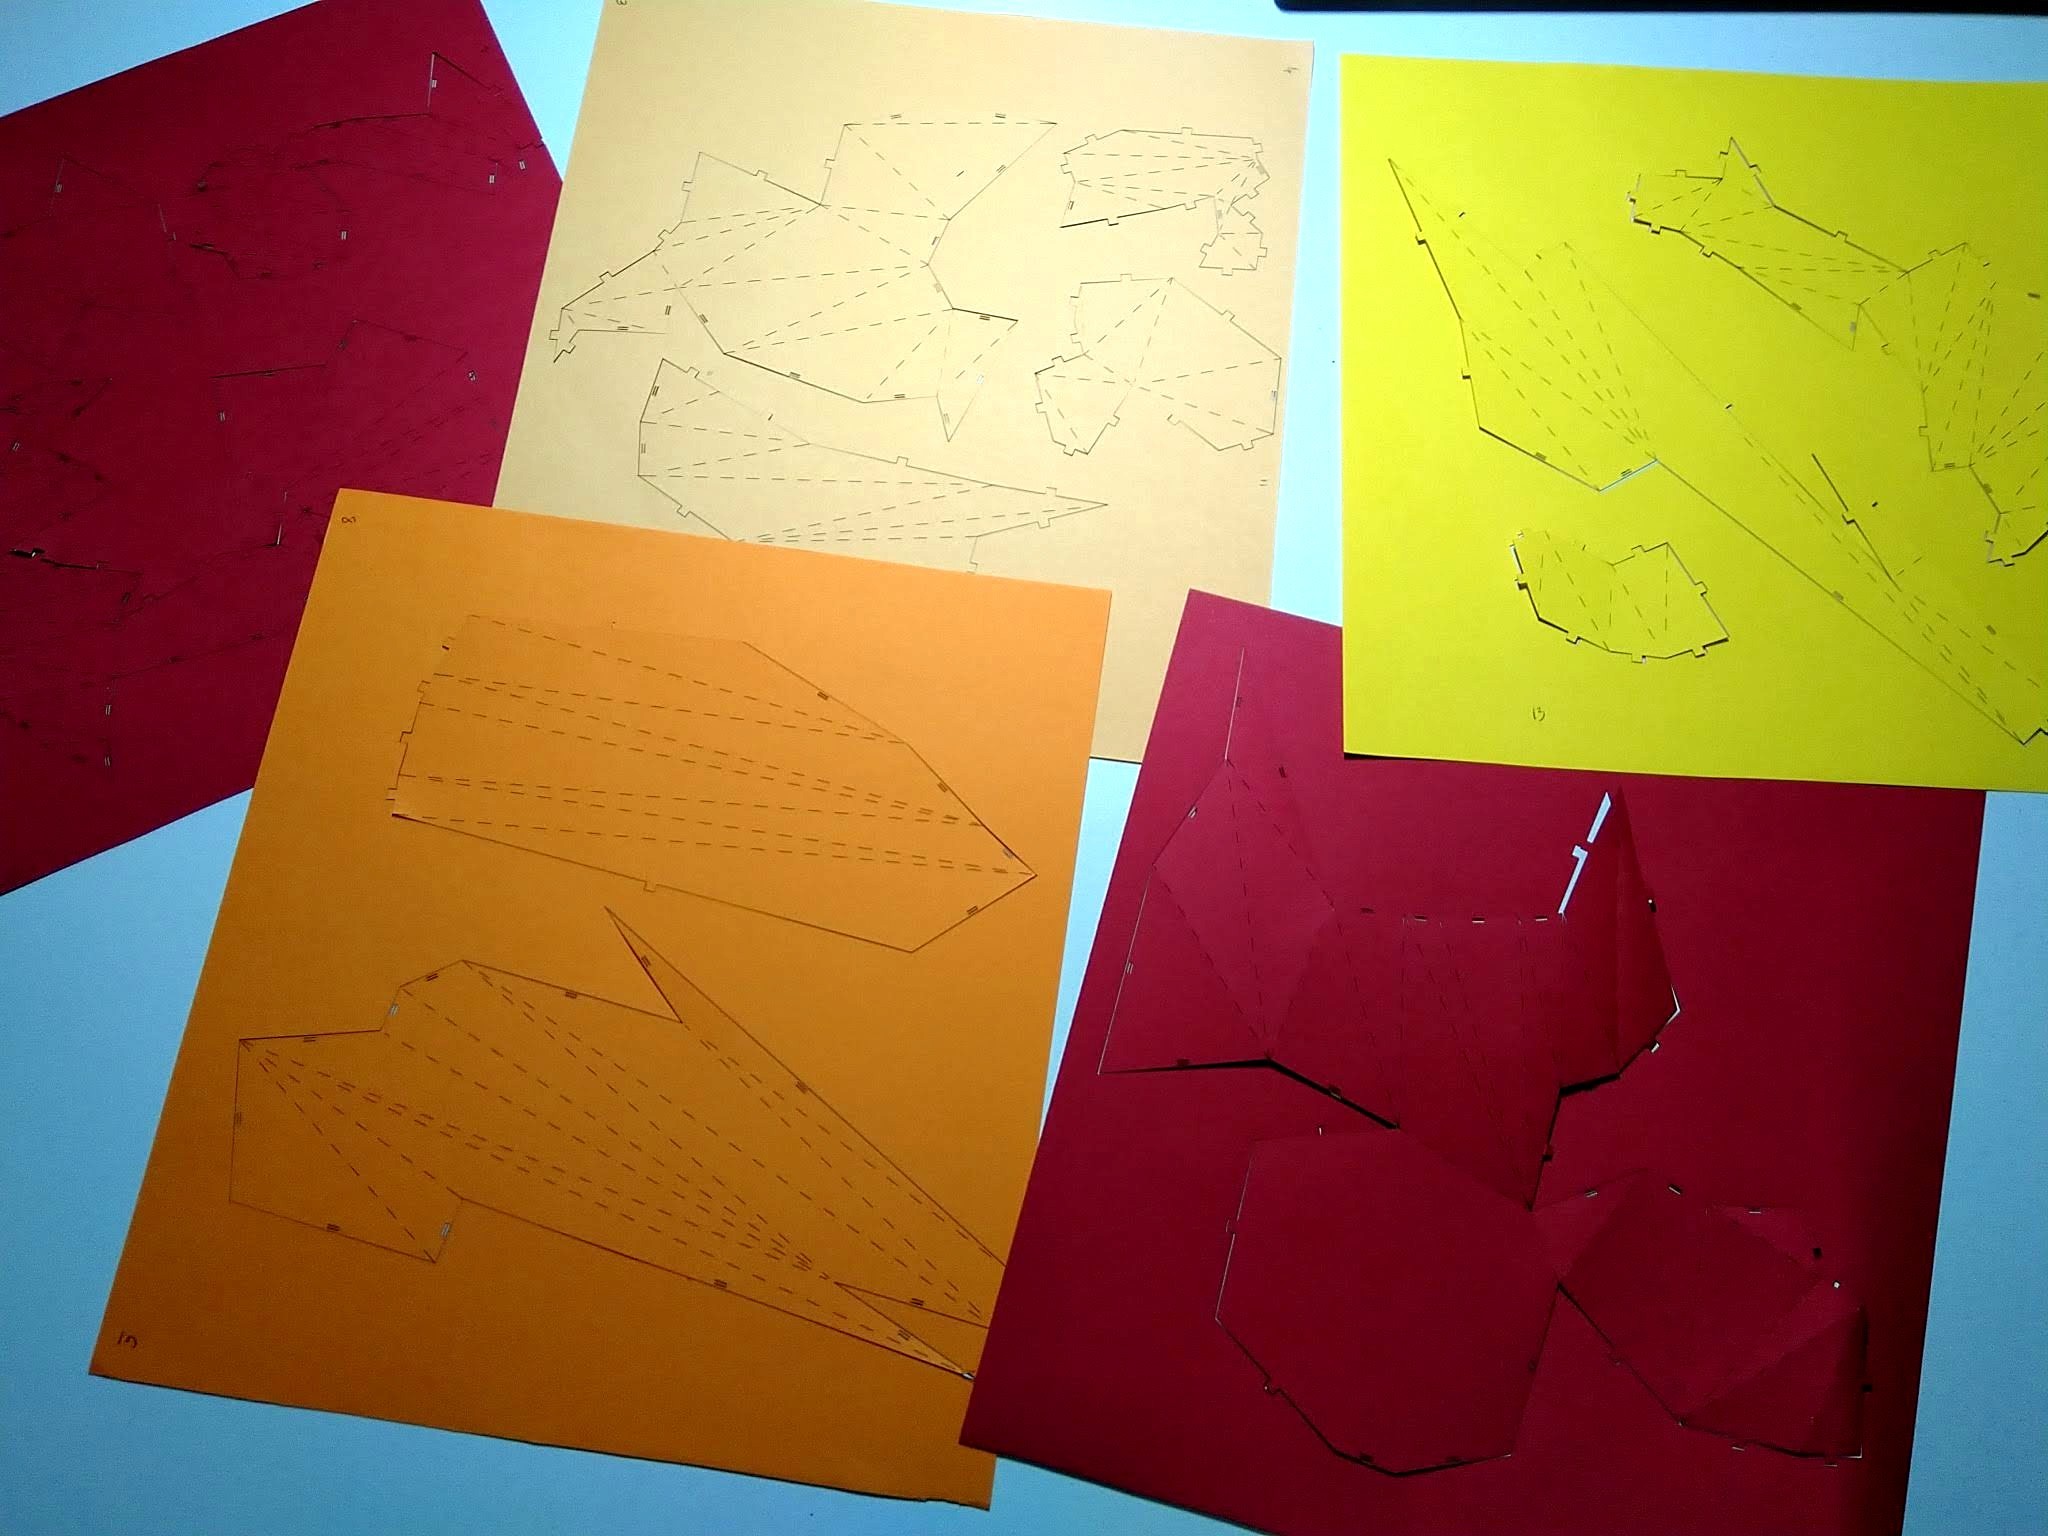
Laser cutting the pieces
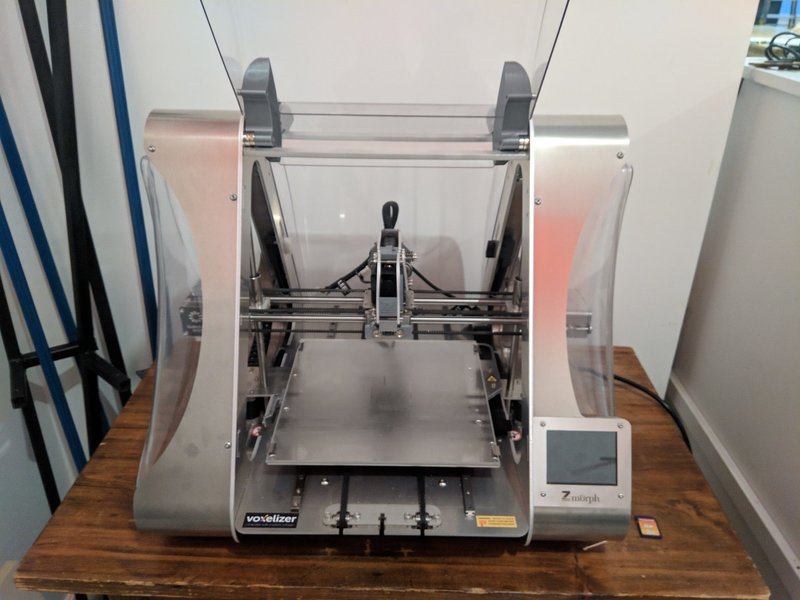
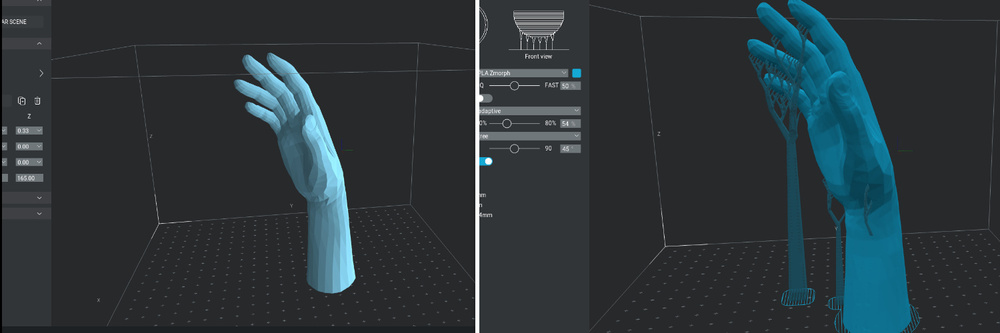
In the Textile Lab we have the ZMorph VX, which is a multitool machine: it has different heads that can be used to 3D print, laser cut, or extrude.
The software used to prepare the plans for the machine is Voxelizer. There are several steps to observe to go from our .dxf plans to .gcode files that the machine can interpret. For each page of the plan:
- Import the .dxf file
- Center the plan on the board
- Choose the material. I used drawing paper, first of weight 180g/m², then 160g/m². On the machine, we choose cardboard.
- Choose the speed. The slower the laser goes, the more it burns the material. The default speed for cardboard on this machine is 10mm/s. After a first test, I changed it to 15mm/s to make it go faster, as the paper I was using was a bit thinner than cardboard.
The result is a .gcode file that needs to be loaded on an sdCard inserted in the machine.
The material is fixed to the board, and the machine needs to be calibrated on all its axis, in order to start at the right point.
Zmorph
When using the machine, never leave it unattended, and always wear protection.
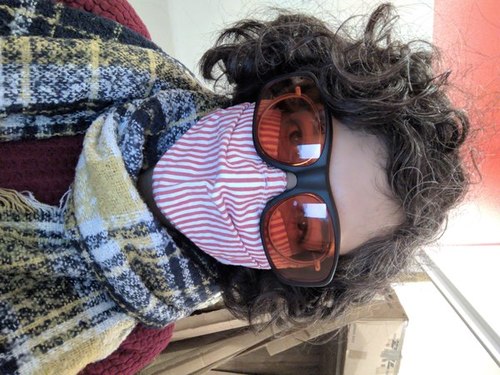
All the protections
First tests
I first tested one of the plans, the base of the arm, with a white drawing paper (180g/m²). The result was quite concluding, and this part was easy to fold:
I then decided I wanted to cut it out of colored paper (because why not). This paper is a bit thinner (160g/m²), so I increased the laser speed a little bit. My first test was a semi-fail : the speed was good, but I did not calibrate the machine correctly, so the laser went past the edge of the board (oops):
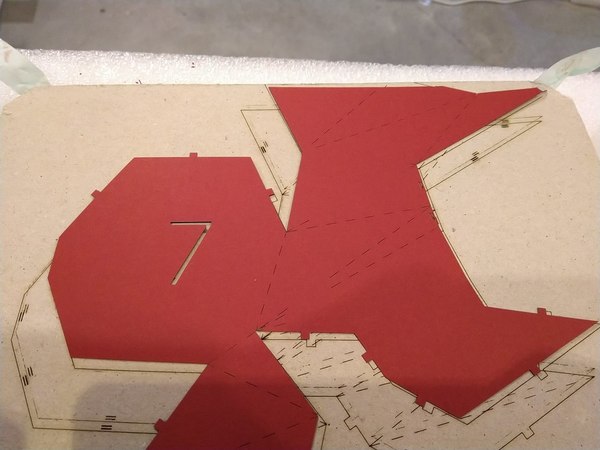
Final cutting
The final cut looked like this for all the plans:
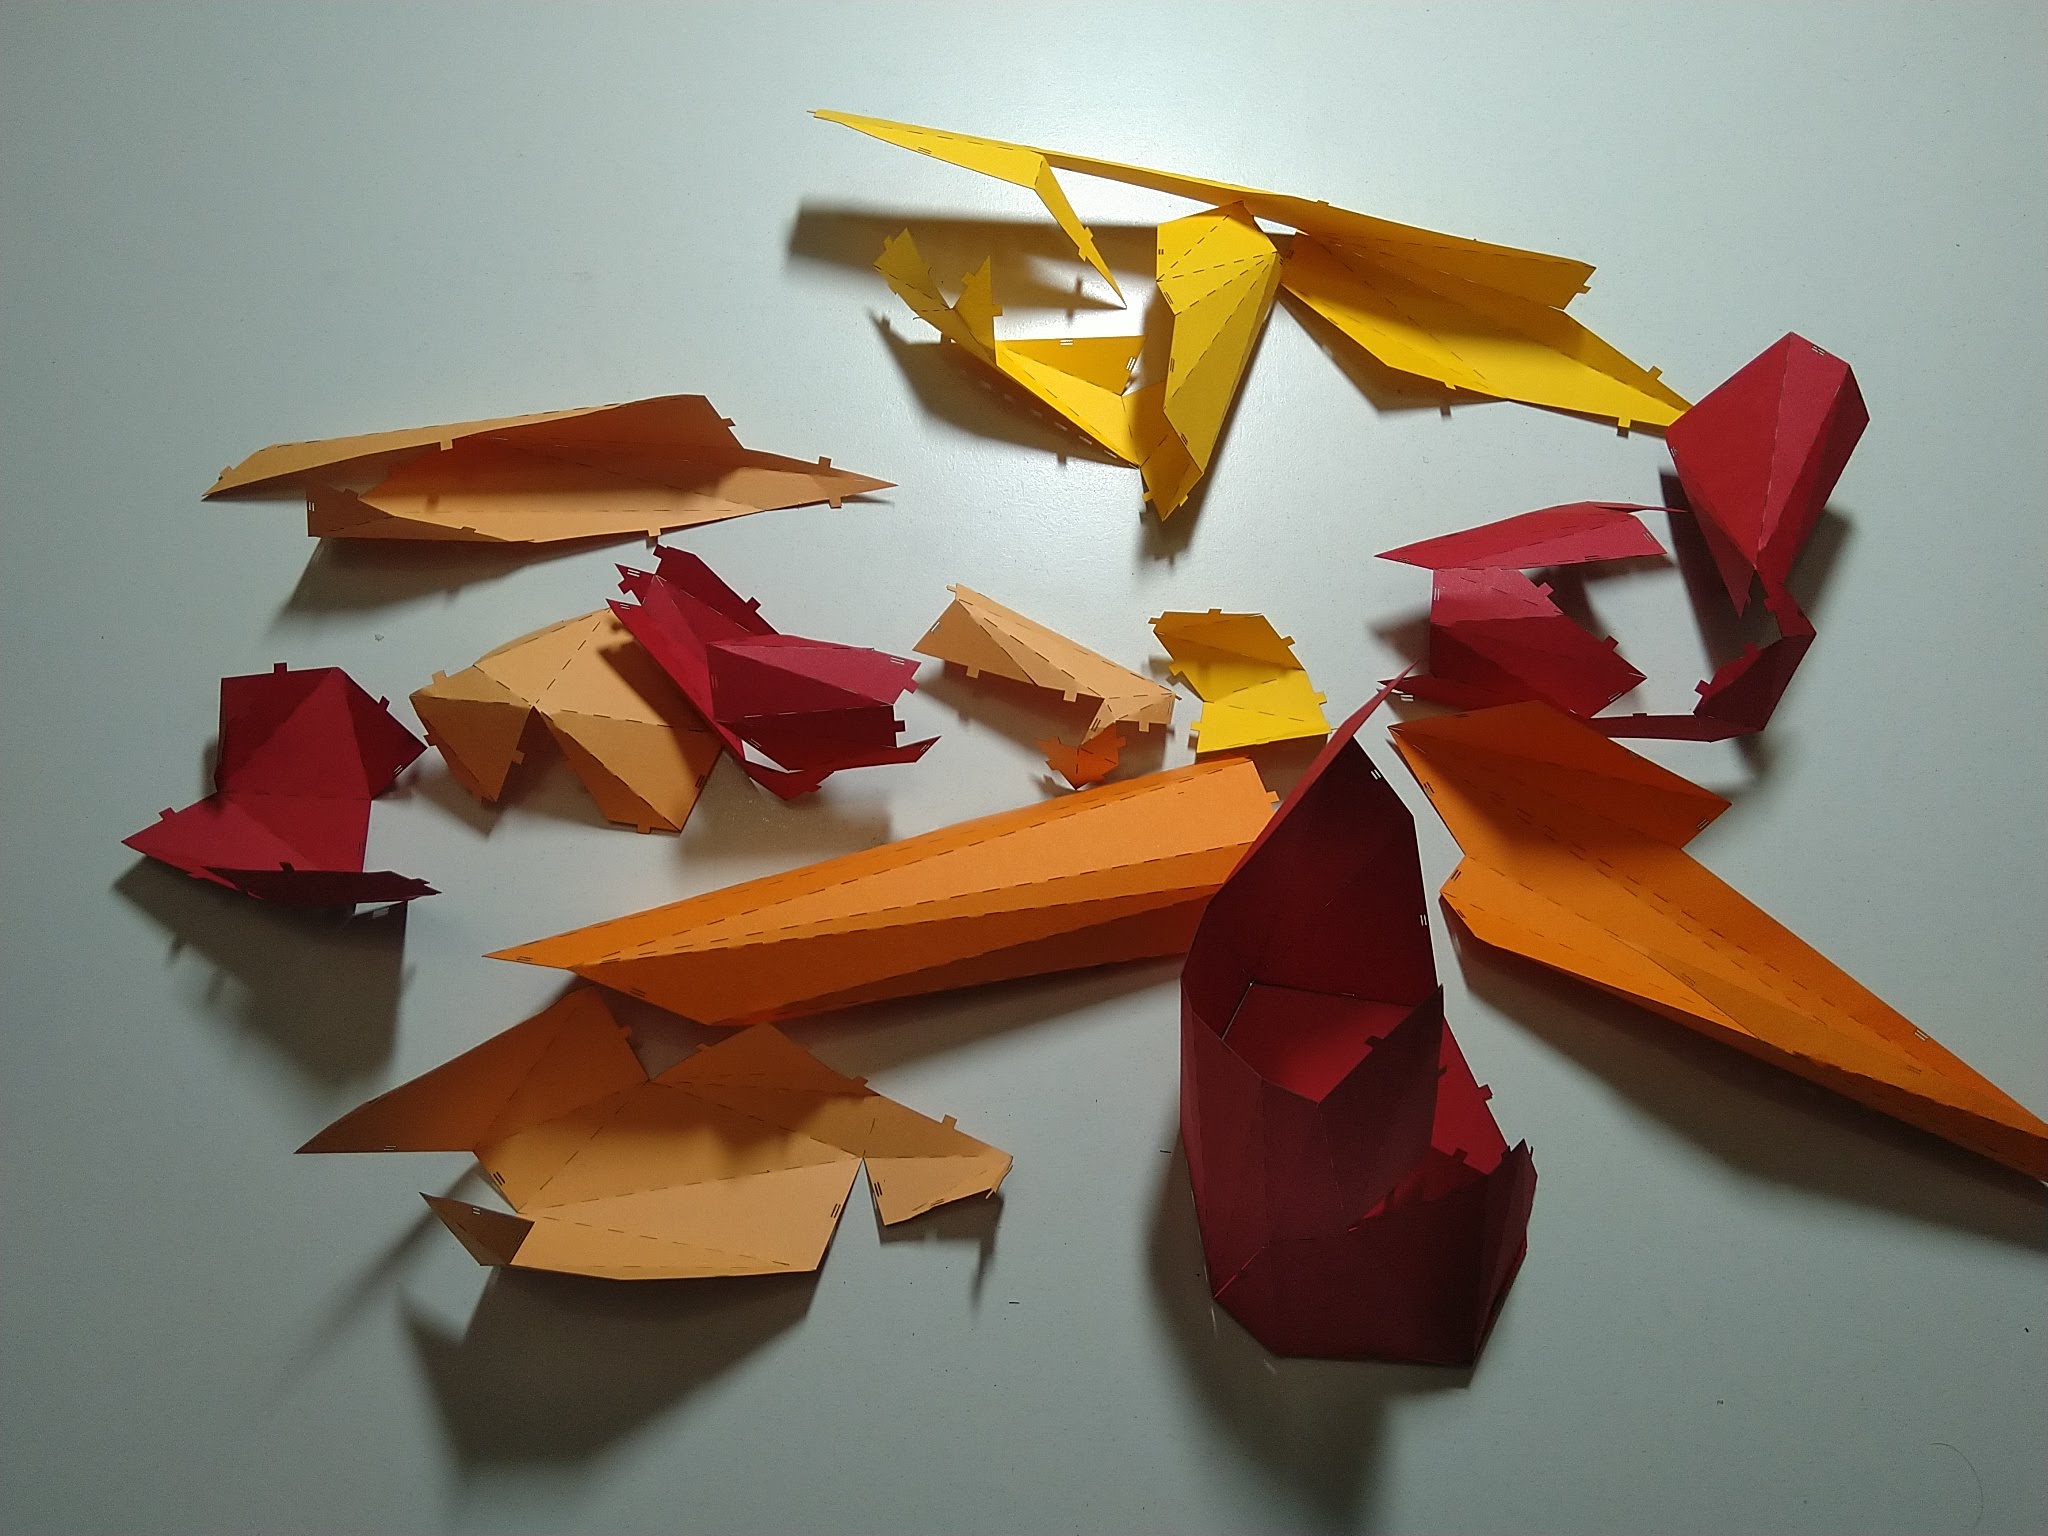
What I could improve
🔺 In the folded panels hand, I could have fewer vertex: I don't need that much precision in the hand, and I'd rather it be a block that's easier to construct;
🦾 I could have less inclined arms, so that they can be standalone pieces;
🖐🏼 When assembling the panels, I should have started by folding the fingers, not the base...
🔧 I could maybe use another type of joint, a sturdier one.
A few weeks later...
I decided to remake this mini-project for a sculpture that would be a Christmas gift :
- one of the hand would be 3D-printed
- the other one out of paper, folded or sliced
I modified the hand model so that is would be less inclined and able to stand on its own. I also shortened it, mainly because to 3D-print it in our machine in one piece it had to be shortened!
The model of the paper hand in Slicer, and the plans laid out in Rhino
The 3D hand in Voxelizer, on the right with the printing supports
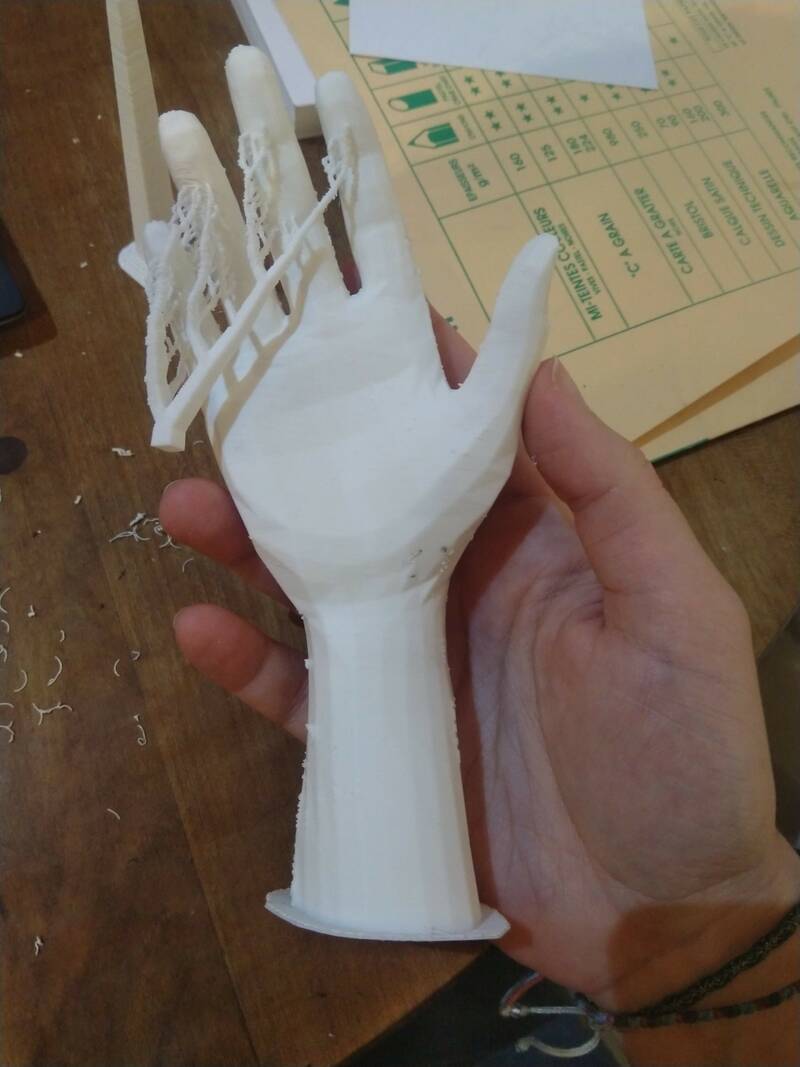
The 3D-printed hand in PLA, before removing the printing supports
After removing the supports, I sanded it and painted it with acrylic paint, so that it would be smoother.
Unfortunately I don't have a video of the assembly of the sliced hand, but I might do this sculpture again and make it then. It is cut from thick drawing paper, which I varnished lightly before assembling.
Both hands were then stuck to the base, which is actually an old phone cardboard box that I spray-painted blue. The final sculpture looks like this:

Resources
You can download the files I used to make both these mini-projects:
Folded panels hand
- The 3D model of the hand and arm after meshing new fingers on it: frankensteinFingers.stl
- The plans to cut it: hand-panels-all-plans.dxf
Interlocked hand
- The 3D model of the hand: handy.stl
- The plans to cut it: interlock-all-plans.dxf
3D hand
- The 3D model of the hand (it's the same as the interlocked one): handy.stl